
A MIDI cable carries MIDI data between compatible electronic instruments, controllers, computers, and other MIDI-enabled equipment rather than transmitting audio in the usual sense. Today, MIDI connections can use traditional 5-pin DIN connectors, TRS connectors, USB, and other device-specific configurations.
However, identifying a MIDI connector by shape is only the first step. A MIDI connector can physically fit and still be electrically or functionally incompatible. Compatibility can depend on MIDI IN/OUT direction, TRS Type A or Type B wiring, USB interface requirements, pinout, and how the connected devices implement MIDI communication.
It will also help you understand which MIDI cable you need, how to connect it correctly, and why apparently compatible MIDI cables sometimes fail to work.
What Does a MIDI Cable Actually Carry?
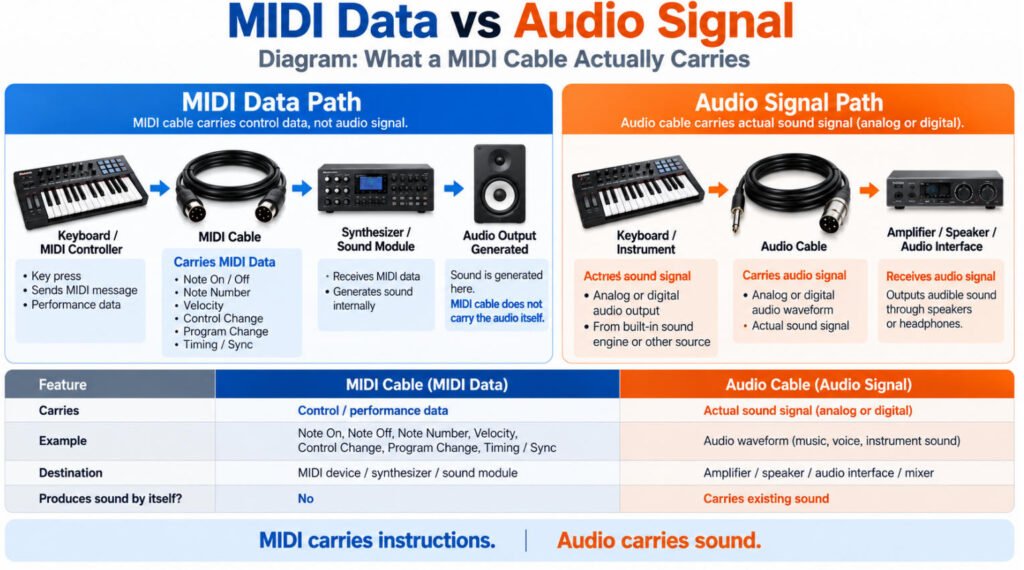
A MIDI cable carries digital control and performance data, not the actual audio signal. In a traditional MIDI connection, the cable transmits instructions that tell another device what to do musically, rather than carrying the sound itself.
Typical MIDI data may include:
- Note On / Note Off
- Note number
- Velocity
- Control changes
- Program changes
- Timing and synchronization information
This is one of the most important points for buyers and users to understand:
MIDI data ≠ audio signal
For example, when a player presses a key on a keyboard, the keyboard can send a MIDI message through the cable to a synthesizer. The synthesizer then interprets that message and generates the sound internally.
The signal path is like this:
Keyboard key pressed → MIDI message → synthesizer → synthesizer generates sound
Not like this:
Keyboard audio → MIDI cable → speaker
This is why a MIDI cable vs audio cable comparison matters. An audio cable carries the actual sound waveform. A MIDI cable carries performance instructions such as which note to play, how hard it was played, and when it should start or stop.
In our engineering experience, many users assume that if two devices both have a MIDI connector, the cable must be carrying sound. In reality, MIDI is mainly a communication link for musical data. If you need to hear the sound, you still need the correct audio output path from the instrument, module, interface, or mixer.
How Does a MIDI Cable Connection Work?
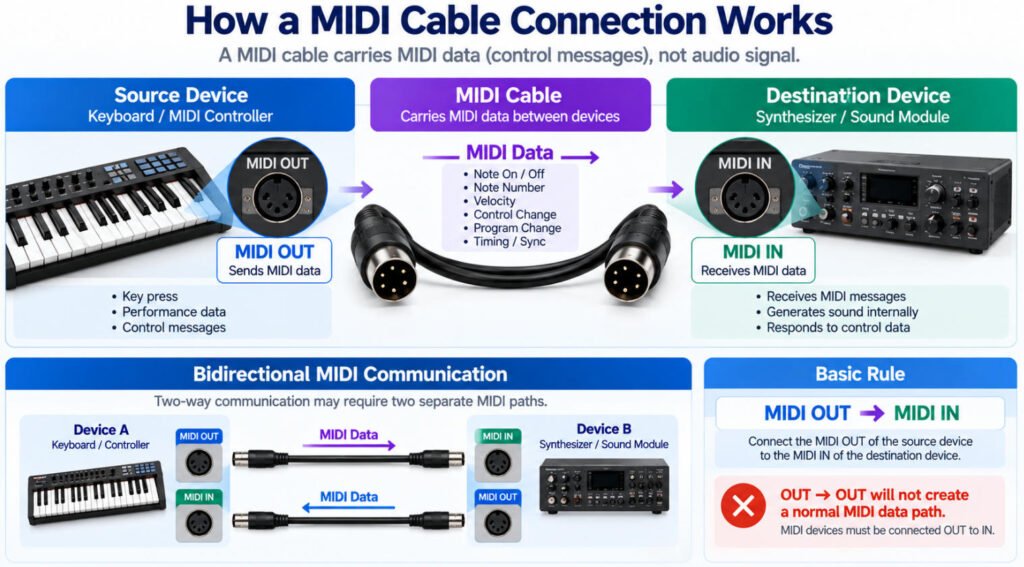
A traditional MIDI cable connection normally follows a simple direction:
Source Device → MIDI OUT → MIDI Cable → MIDI IN → Destination Device
MIDI OUT sends MIDI data, while MIDI IN receives it. For example, if a keyboard is controlling a synthesizer, the connection would normally be:
Keyboard MIDI OUT → MIDI Cable → Synthesizer MIDI IN
Traditional 5-pin DIN MIDI is normally directional. Connecting OUT to OUT or IN to IN will not create the intended MIDI data path a common connection mistake we see when troubleshooting equipment or replacement cables.
If two devices need to exchange MIDI data in both directions, the system may require two separate MIDI paths:
Device A OUT → Device B IN
Device B OUT → Device A IN
However, this does not mean every MIDI setup requires two MIDI cables. The required connection depends on what data needs to move between the devices and how their MIDI interfaces are designed.
What Is the Difference Between MIDI IN, OUT and THRU?
MIDI IN receives MIDI data, MIDI OUT sends MIDI data generated or transmitted by a device, and MIDI THRU passes received MIDI data onward to another MIDI device. In a basic MIDI connection, the sending device’s MIDI OUT connects to the receiving device’s MIDI IN.
| MIDI Port | Function |
|---|---|
| MIDI IN | Receives MIDI data from another device |
| MIDI OUT | Sends MIDI data generated or transmitted by the device |
| MIDI THRU | Passes received MIDI data onward to another device |
How Are MIDI IN and OUT Connected?
The basic rule is:
Source MIDI OUT → MIDI Cable → Destination MIDI IN
For example, a MIDI keyboard can send note and control messages from its MIDI OUT to the MIDI IN of a synthesizer or sound module.
What Is MIDI THRU Used For?
MIDI THRU is useful when MIDI data needs to continue from one receiving device to another device.
A typical connection is:
Device A MIDI OUT → Device B MIDI IN
Device B MIDI THRU → Device C MIDI IN
This allows MIDI data received by Device B to continue to Device C without requiring the original source to connect directly to both devices.
Some modern MIDI equipment may also provide software or soft-thru functionality rather than, or in addition to, a dedicated MIDI THRU port. The exact behavior depends on the device, so its documentation should be checked when configuring a multi-device MIDI connection.
What MIDI Cable Do I Need?
The right MIDI cable depends on the ports and MIDI implementation at both ends of the connection. A practical selection process is:
Check Device A Port → Check Device B Port → Confirm Direction → Confirm MIDI Transport → Confirm Wiring / Type → Select Cable or Interface
Use this table as a quick MIDI cable compatibility guide:
| Device A | Device B | Typical Requirement |
|---|---|---|
| 5-pin MIDI OUT | 5-pin MIDI IN | 5-pin DIN MIDI cable |
| TRS MIDI | 5-pin MIDI | Correct Type A/B TRS-to-DIN cable |
| USB-MIDI device | Computer | Compatible USB cable |
| 5-pin DIN MIDI | Computer USB | MIDI-to-USB interface |
| TRS MIDI | TRS MIDI | Confirm Type A/B compatibility |
The connector shape alone is not enough. For example, two devices may both have 3.5 mm TRS MIDI ports but use different Type A/B wiring. Likewise, a traditional 5-pin DIN MIDI device cannot normally communicate with a computer USB port through simple passive wiring—the connection requires the appropriate MIDI-to-USB interface.
When selecting between different MIDI cable types, first identify the two device ports, then confirm direction, pinout, and interface requirements.
5-Pin DIN vs TRS vs USB MIDI: What Is the Difference?
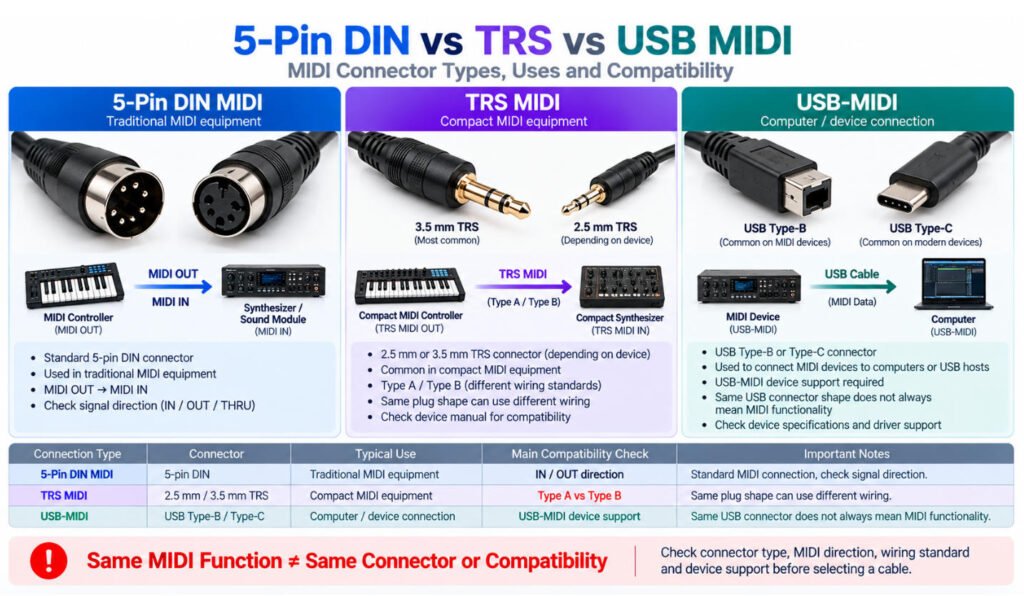
The main difference between 5-pin DIN, TRS, and USB MIDI is the physical interface and transport method used to carry MIDI data. The MIDI Association recognizes traditional 5-pin DIN, TRS, and USB-MIDI as distinct MIDI transport approaches.
| MIDI Connection | Connector | Typical Use | Key Compatibility Check |
|---|---|---|---|
| 5-Pin DIN | DIN 5-pin | Traditional MIDI equipment | MIDI IN / OUT direction |
| TRS MIDI | 2.5 mm or 3.5 mm TRS, depending on device | Compact MIDI equipment | Type A vs Type B wiring |
| USB-MIDI | USB-A, USB-B, or USB-C, depending on device | Computer / device connection | USB-MIDI support |
5-Pin DIN MIDI
A 5-pin MIDI cable is the traditional physical connection used for MIDI 1.0 equipment. The key check is normally the signal path:
MIDI OUT → MIDI cable → MIDI IN
TRS MIDI
A TRS MIDI cable uses a smaller tip-ring-sleeve connector, commonly on compact devices. Compatibility depends on the device wiring, especially TRS Type A vs Type B. The MIDI Association specifically standardized TRS wiring because different pin assignments had existed in the market.
USB-MIDI
A USB MIDI cable or USB connection transports MIDI data over USB. The connector may be USB-A, USB-B, or USB-C depending on the equipment, but connector shape alone does not confirm USB-MIDI support.
In our experience, the most important rule when comparing MIDI cable types is simple: same physical fit does not always mean the same MIDI compatibility.
Is a 5-Pin DIN Cable the Same as a MIDI Cable?
Not necessarily. A 5-pin DIN connector describes the physical connector format, while MIDI describes the communication function.
A cable with a 5-pin DIN connector is not automatically a MIDI cable. Similar DIN connectors can be used in other equipment and applications, and the internal wiring may not match what the MIDI device requires.
For a 5-pin DIN MIDI cable, you must check:
- Port label — Is the interface actually marked MIDI IN, OUT, or THRU?
- Device specification — Does the equipment specify a MIDI interface?
- Wiring — Are the required pins connected correctly for the application?
- Intended function — Was the cable designed for MIDI communication?
In our engineering work, we never identify a replacement cable from connector appearance alone. For OEM or legacy equipment, we confirm the connector, pinout, wiring, and device function before production.
Why Can TRS MIDI Cables Be Incompatible?
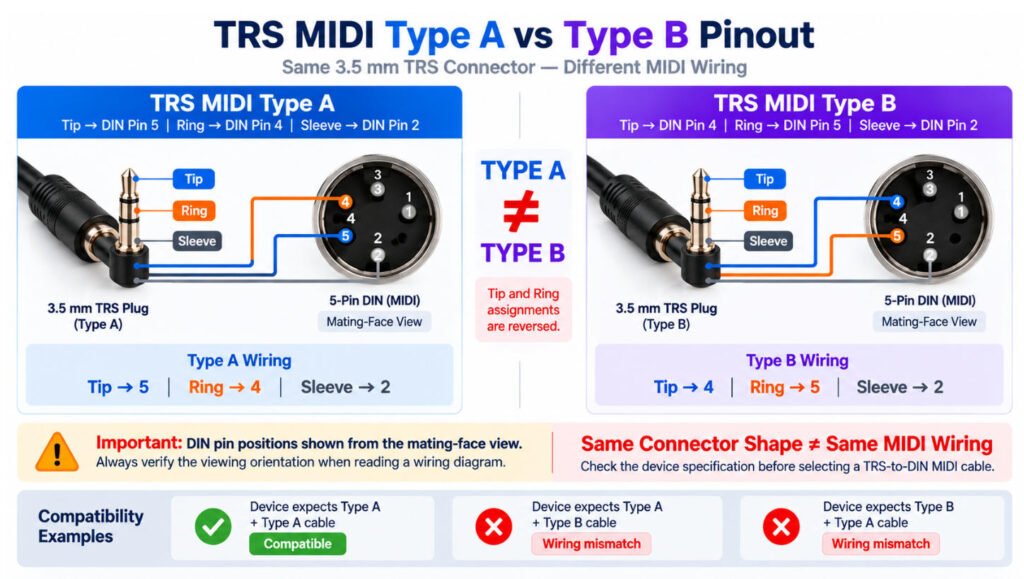
Two TRS MIDI cables can use the same 3.5 mm plug but still be incompatible because the Tip and Ring contacts may be assigned differently.
TRS stands for:
Tip → Ring → Sleeve
For MIDI applications, the same physical TRS connector has historically been wired in two main configurations: Type A and Type B.
| Connection | TRS MIDI Type A | TRS MIDI Type B |
|---|---|---|
| Tip | MIDI DIN Pin 5 | MIDI DIN Pin 4 |
| Ring | MIDI DIN Pin 4 | MIDI DIN Pin 5 |
| Sleeve | MIDI DIN Pin 2 | MIDI DIN Pin 2 |
The key difference is that Tip and Ring are reversed between Type A and Type B. This means a 3.5 mm TRS MIDI cable may physically fit the device perfectly but still fail to provide the required MIDI connection if the wiring type is wrong.
This is why we never identify a custom or replacement MIDI TRS cable by connector size alone. For OEM projects, we confirm the device specification, TRS MIDI pinout, connector size, IN/OUT function, and Type A/B requirement before defining the cable.
Same TRS connector ≠ same MIDI wiring.
TRS MIDI Type A vs Type B: What Is the Difference?
TRS MIDI Type A and Type B use the same physical TRS connector, but the Tip and Ring assignments are reversed. Externally, the cables can look identical; electrically, they are wired differently.
For a TRS connector:
Tip → Ring → Sleeve
The common TRS-to-5-pin DIN MIDI mappings are:
| Connection | Typical Purpose | Interface Electronics Required? |
|---|---|---|
| USB-MIDI device → USB cable → Computer | Connects a device with native USB-MIDI support | MIDI-over-USB functionality is built into the device |
| 5-pin DIN MIDI → MIDI-to-USB interface → Computer | Connects traditional DIN MIDI equipment to USB | Yes, typically requires interface electronics |
The MIDI Association documents these two wiring arrangements: Type A maps Tip to DIN Pin 5 and Ring to Pin 4, while Type B reverses those two connections.
Why Does Type A vs Type B Matter?
Consider two identical-looking 3.5 mm to 5-pin MIDI cables:
Type A
Tip → Pin 5
Ring → Pin 4
Sleeve → Pin 2
Type B
Tip → Pin 4
Ring → Pin 5
Sleeve → Pin 2
Because Pins 4 and 5 serve different parts of the MIDI electrical path, using the wrong TRS wiring can prevent communication even though the connector plugs into the device normally.
The MIDI Association introduced a TRS connector specification specifically because manufacturers had previously implemented more than one wiring scheme, creating interoperability problems between devices.
When reading a 5-pin DIN wiring diagram, always check whether the drawing shows the mating/front view or the wiring/solder-side view. The connector can appear mirrored when viewed from opposite sides, so copying pin positions visually without checking the stated orientation can result in incorrect wiring.
How Do You Know Whether You Need Type A or Type B?
Do not determine the type from the 3.5 mm connector itself. Type A and Type B normally look the same externally.
Instead, check:
- Device manual
- Manufacturer pinout
- MIDI implementation information
- Existing approved adapter or cable
- Pin-to-pin wiring with appropriate test equipment
The practical rule is:
Same TRS connector ≠ same TRS MIDI pinout.
For a custom TRS MIDI cable, we define the connection as Tip-to-pin, Ring-to-pin, and Sleeve-to-pin on the production drawing rather than writing only “3.5 mm to 5-pin MIDI cable.” We also define the DIN connector viewing orientation so the production and inspection teams are checking the same pin numbering reference.
Can You Connect 5-Pin MIDI Directly to USB?
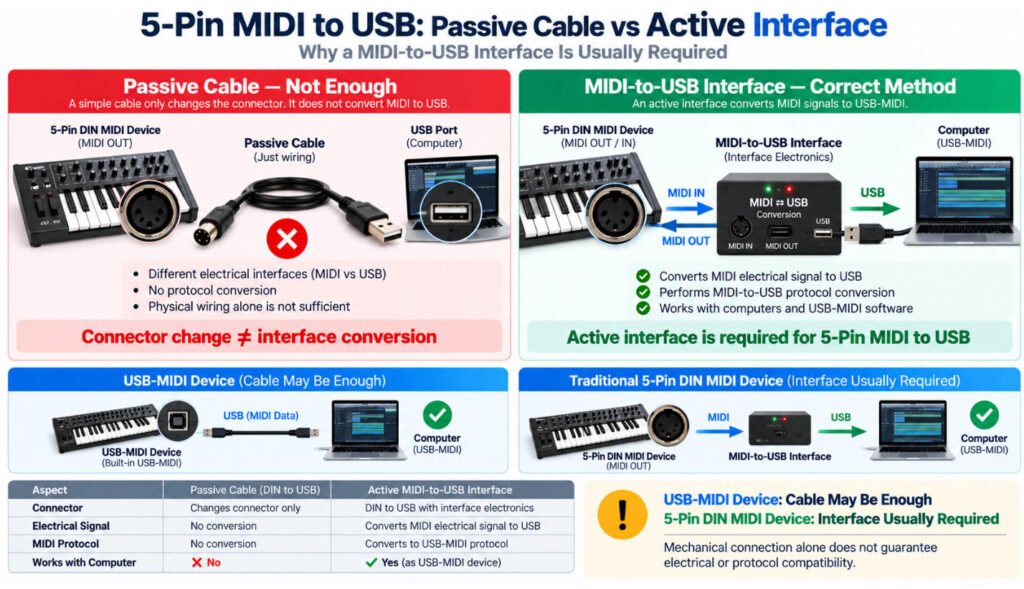
A traditional 5-pin MIDI interface cannot normally be converted to USB by passive wiring alone; a MIDI-to-USB interface is typically required.
The reason is that traditional DIN MIDI and USB-MIDI use different transport methods.
For a device with native USB-MIDI support, the connection may be:
USB-MIDI Device → USB Cable → Computer
For a traditional 5-pin DIN device, the connection is typically:
5-Pin DIN MIDI → MIDI/USB Interface → USB → Computer
A MIDI USB interface contains the electronics needed to bridge the traditional MIDI electrical interface and USB communication. A simple cable that only changes the connector from 5-pin DIN to USB does not automatically provide that conversion.
The MIDI Association treats traditional 5-pin DIN MIDI and USB-MIDI as different MIDI transports, which is why a suitable interface or bridge is normally required when connecting legacy DIN MIDI equipment to a computer over USB.
In our experience, when specifying a 5-pin MIDI to USB assembly, the first question should be whether the product needs only a cable connection or an active MIDI-to-USB adapter/interface with conversion electronics.
USB MIDI Cable vs MIDI-to-USB Interface: What Is the Difference?
A USB MIDI cable typically connects a device that already supports USB-MIDI, while a MIDI-to-USB interface bridges traditional MIDI, such as 5-pin DIN MIDI, with a USB host such as a computer.
The key distinction is:
Connector conversion is not the same as protocol/interface conversion.
| Connection Type | Typical Connection | Active Interface Electronics Required? |
|---|---|---|
| USB MIDI Cable | USB-MIDI Device → USB Data Cable → Computer | No, when the device already supports USB-MIDI |
| MIDI-to-USB Interface | 5-Pin DIN MIDI → MIDI-to-USB Interface → Computer USB | Yes, typically required to bridge traditional MIDI and USB communication |
| TRS MIDI to USB | TRS MIDI Device → Compatible MIDI Interface → USB Host | Depends on the device pinout and destination interface |
What Is a USB MIDI Cable?
If a keyboard, controller, synthesizer, or other device already supports USB-MIDI, a compatible USB data cable can connect it to a USB host.
For example:
USB-MIDI Keyboard → USB Data Cable → Computer
In this situation, the cable itself does not need to convert traditional DIN MIDI into USB. The connected equipment already provides the required USB-MIDI functionality.
It is still important to use a USB cable that supports the required data connection rather than assuming every physically compatible USB cable will work.
What Is a MIDI-to-USB Interface?
A MIDI-to-USB interface is used when traditional MIDI equipment needs to communicate with a USB host.
For example:
Synthesizer MIDI OUT → MIDI-to-USB Interface → Computer USB
Unlike a simple passive cable, the interface normally contains electronics that bridge the traditional MIDI connection and USB communication.
Some products marketed as a USB MIDI cable have 5-pin DIN connectors on one end and USB on the other. Although they look like cables, they may actually contain the required interface electronics inside an inline housing or USB-side enclosure.
How Can You Tell Which One You Need?
Check the MIDI ports on the device first:
- Device has native USB-MIDI: use the appropriate USB data cable.
- Device has only 5-pin DIN MIDI: use a suitable MIDI-to-USB interface when connecting to a computer or other compatible USB host.
- Device has TRS MIDI: first verify its TRS MIDI type and pinout, then determine whether an additional interface is required for the destination.
Do not select a solution based only on connector shape.
For DIN MIDI to USB, the important question is not simply, “Can these two connectors be adapted?” It is:
Do these two interfaces communicate using the same transport, or is active interface conversion required?
How Do You Connect a MIDI Keyboard to a Computer?
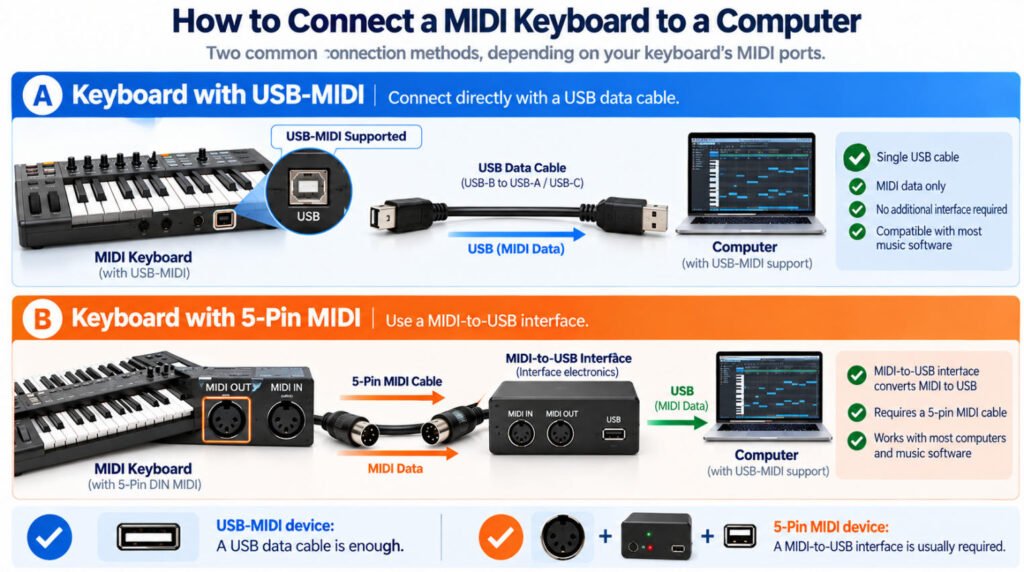
To connect a MIDI keyboard to a computer, first check whether the keyboard supports USB-MIDI or uses traditional 5-pin MIDI. A USB-MIDI keyboard can normally connect with a compatible USB data cable, while a keyboard with only 5-pin MIDI typically requires a MIDI-to-USB interface.
1.Keyboard Has USB-MIDI
If the keyboard supports MIDI directly over USB, the connection is usually:
MIDI Keyboard → Compatible USB Data Cable → Computer
Depending on the keyboard, the physical USB connector may be USB-B, USB-C, or another supported USB type.
The important point is that the keyboard itself must support USB-MIDI. The cable provides the USB data connection; it does not add MIDI functionality to a device that does not already support it.
Also make sure the cable supports data transmission. A charge-only USB cable will not provide the required MIDI data connection.
2.Keyboard Has 5-Pin MIDI
If the keyboard has traditional 5-pin MIDI but no native USB-MIDI connection, use a MIDI-to-USB interface:
Keyboard MIDI OUT → MIDI Interface IN → USB → Computer
The keyboard sends MIDI messages through its MIDI OUT port. The interface receives those messages and bridges the traditional MIDI connection to USB for the computer.
A passive connector adapter is normally not sufficient for this connection because 5-pin DIN MIDI and USB are different interfaces.
Check the Computer and Software
After making the physical connection, confirm that the computer recognizes the MIDI device or interface. Where applicable, install or select the driver recommended by the equipment manufacturer.
Then select the correct MIDI input or device in the music software you are using.
For most setups, the selection process can be simplified to:
Check Keyboard Port → Identify MIDI Interface → Choose Cable or Interface → Connect to Computer → Select MIDI Device in Software
How Do You Connect Two MIDI Devices?
How Do You Connect Two MIDI Devices?
To connect two MIDI devices, the basic rule is:
Device A MIDI OUT → MIDI Cable → Device B MIDI IN
The sending device uses MIDI OUT, while the receiving device uses MIDI IN.
If the two devices need to communicate in both directions, a second connection may be required:
Device B MIDI OUT → Device A MIDI IN
If one device provides MIDI THRU, the incoming MIDI data can also be passed to another device in a chain.
For example:
Device A OUT → Device B IN
Device B THRU → Device C IN
When you connect two MIDI devices, avoid connecting OUT to OUT or IN to IN, because the signal direction is incorrect.
In our experience, checking the MIDI signal path first is one of the fastest ways to troubleshoot a basic MIDI cable connection.
Why Is My MIDI Cable Not Working?
If your MIDI cable is not working, first check the connection direction, connector type, pinout, MIDI settings, and whether the connection requires an active interface. A plug that physically fits does not necessarily mean the devices are MIDI-compatible.
Use this table for a quick diagnosis:
| Problem | Possible Cause |
|---|---|
| No MIDI Data | MIDI OUT/IN connected incorrectly or wrong port selected |
| TRS MIDI Not Working | Type A / Type B or pinout mismatch |
| USB MIDI Not Detected | USB cable, device, interface, driver, or configuration issue |
| Notes Not Responding | MIDI channel or device settings mismatch |
| Intermittent Connection | Damaged cable, connector, conductor, or termination |
| DIN-to-USB Does Nothing | Passive wiring used where MIDI-to-USB interface electronics are required |
| Plug Fits but No Communication | Connector, function, pinout, or interface incompatibility |
1. Check MIDI OUT and MIDI IN
For a basic traditional MIDI connection, data normally travels:
Source MIDI OUT → MIDI Cable → Destination MIDI IN
Connecting OUT to OUT or IN to IN will not create the intended data path.
2. Check the TRS MIDI Type
If a TRS MIDI cable is not working, verify whether the equipment uses Type A or Type B wiring.
The connectors may look identical while the Tip and Ring assignments differ. Physical fit therefore does not confirm electrical compatibility.
3. Check the USB Connection
If USB MIDI is not detected, confirm that the device supports USB-MIDI and that the USB cable supports data rather than charging only.
For traditional 5-pin DIN equipment, remember that a simple passive DIN-to-USB cable is normally insufficient. A suitable MIDI-to-USB interface is typically required.
4. Check MIDI Channels and Device Settings
A working cable does not guarantee that the receiving device will respond. The transmitting and receiving equipment must also be configured correctly.
If MIDI data appears to be reaching the system but notes or controls do not respond as expected, check the MIDI channel, routing, software device selection, and other relevant equipment settings.
5. Inspect the Cable and Connectors
If the connection works intermittently, inspect the cable for:
- Bent or damaged connector contacts
- Loose connector fit
- Cable damage near strain-relief areas
- Broken or intermittent conductors
- Poor internal termination
A continuity test can help identify an open or incorrectly wired conductor, although electrical continuity alone does not confirm that the complete MIDI system is configured correctly.
A Simple MIDI Troubleshooting Sequence
When troubleshooting a MIDI cable connection, use this order:
Check Ports → Check IN/OUT Direction → Check Connector and Pinout → Check TRS Type if Applicable → Check Cable/Interface → Check MIDI Settings → Test Cable Continuity
Can a MIDI Cable Fit but Still Be Incompatible?
Yes. Physical connector compatibility does not guarantee electrical or protocol compatibility.
A MIDI plug may fit the device correctly and still fail to communicate because the wiring, signal function, or interface type is different.
Common examples include:
- TRS MIDI Type A vs Type B Both may use the same 3.5 mm TRS connector, but the Tip and Ring assignments are different. A Type A cable can physically fit a Type B device and still be incompatible.
- 5-Pin DIN Used for Non-MIDI Functions A 5-pin DIN connector describes the physical interface, not the function. Equipment may use the same connector style for other signals or device-specific wiring.
- 5-Pin DIN MIDI to USB A DIN plug on one end and USB connector on the other does not automatically create a working MIDI-to-USB connection. Traditional DIN MIDI normally requires the appropriate interface electronics to communicate with USB.
The practical rule for MIDI cable compatibility is:
Physical Fit ≠ Wiring Compatibility ≠ Protocol Compatibility
So, if you are asking “are all MIDI cables the same?”, the answer is no. The connector may match while the wiring, MIDI transport, signal direction, or device implementation does not.
How Do You Choose the Right MIDI Cable?
How Do You Choose the Right MIDI Cable?
To choose the right MIDI cable, start with the two devices being connected and work through the electrical and mechanical requirements in order.
A practical MIDI cable selection workflow is:
Device A → Device B → Port Type → MIDI Direction → Transport → TRS Type / Pinout → Interface Requirement → Length → Mechanical Requirement
Before selecting the cable, check:
- Port type – 5-pin DIN, TRS, USB, or another interface
- MIDI direction – MIDI OUT, MIDI IN, or THRU
- TRS wiring – Type A or Type B where applicable
- USB function – Direct USB-MIDI or DIN-to-USB interface
- Cable length – Appropriate for the transport and installation
- Connector orientation – Straight or right-angle
- Environment – Temperature, EMI, abrasion, or installation conditions
- Flexing – Whether the cable will move repeatedly during use
- Device specification – Pinout, connector details, and interface requirements
The most important point is to choose the cable by function and compatibility, not only by connector appearance.
For example, a 3.5 mm plug may fit a MIDI device but use the wrong TRS wiring, while a DIN-to-USB assembly may require active interface electronics rather than passive wiring.
Manufacturer Insight: For a custom MIDI cable assembly, we normally confirm both mating devices, connector part numbers, MIDI direction, pinout, cable length, connector orientation, environmental requirements, and test criteria before finalizing the design.
Start With Compatibility, Then Consider Cable Construction
The first question should not be, “What is the best MIDI cable type?” Instead, ask which cable or interface is compatible with the equipment and application.
For example:
5-Pin DIN ↔ 5-Pin DIN
Confirm MIDI OUT/IN direction and the required wiring.
TRS ↔ 5-Pin DIN
Confirm the TRS connector size, Type A/B configuration, and pinout.
USB-MIDI Device ↔ Computer
Confirm native USB-MIDI support and use a compatible USB data cable.
5-Pin DIN MIDI ↔ Computer USB
Use an appropriate MIDI-to-USB interface rather than assuming a passive connector adapter will work.
Conclusion
Choosing the right MIDI cable means looking beyond connector shape. A reliable selection should consider the device, port type, MIDI direction, transport, wiring compatibility, and application requirements together.
If a MIDI connection does not work, check the signal direction, TRS Type A/B, pinout, interface requirements, and device settings before assuming the cable itself is faulty.
For OEM applications, the specification should go further. If you are developing a Custom MIDI Cable assembly, send Yihetai your drawing, connector information, pinout, device specification, or existing sample for engineering review and quotation.
Related Wire Harness Articles:
- Computer Cable Types: A Complete Guide to PC Cables, Connectors, Ports and Uses
- AV Cable Guide: Types, AV In/Out, Connectors, Adapters & Custom Design
- What Are the Main Wire Harness Components? Complete Parts and Selection Guide
- Wire Strain Relief Methods: Types, Design, Testing and How to Choose the Right Solution
- What Is a Wiring Harness? A Complete OEM Guide to Types, Components, Manufacturing, Testing and Supplier Selection